


One of my major goals of motherhood is to cultivate an environment of creativity for my kids. Growing up, creativity gave me an outlet to express myself and to whittle down my passions through trial and error (As it turns out, duct tape purses probably aren’t my lane. Darn). I recently listened to a podcast on creating that childhood magic that now stings as nostalgia, so more than ever, I’m determined to foster my son’s God-given creativity to provide him tools to express himself as he grows and give him the most magical childhood possible.
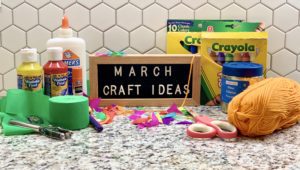
My friend Ashley and I host a Mama and Me Craft Night, so I wanted to share a little of what we’ve been making for the month of March. In addition to each craft that we do each week, it’s been helpful to have all of our kid-safe supplies handy and ready for rainy day activities. I know I personally do best when I have a project prepped or on my mind, and it’s proving the same as a mom. Allowing creative time is smoother when accessing supplies is simple.
What I love about any kid project is that they can be easily modified for bigger or smaller kids or based on time available, supplies, or supervision needed. Instead of paint, washable markers are less messy and quicker; to make a project more challenging for older kiddos, give more options or more independence within the craft; and my best tip, glitter makes everything just a tad more fun. You really can’t go wrong if you focus on the process of creating and not just the product.
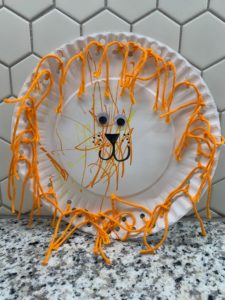
Lion:
Possible Supplies: paper plates, markers, paint, googly eyes, glue, yarn, hole punch
Directions/Options: Using the paper plate as the base for the lion’s head, you can either paint or color the face yellow and mane orange. To make it more complicated, you can hole punch around the edge of the plate and have your kiddo thread small pieces of yarn into two holes each and tying them off. (In my case, my son is 17 months, so he colored the face, and I did the mane while he played close by.). You can combine painting, coloring, and yarn in any combo you like.
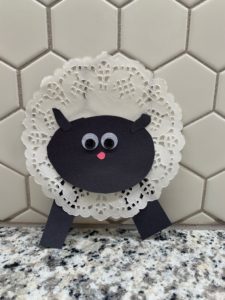
Lamb:
Possible Supplies: paper doilies, black paper, googly eyes, glue, yellow paper, cotton balls
Directions/Options: Simply cut all parts and assemble the lamb. Again, for us, we took the simple route. I let my son color on the doily and dotted glue on the top and had him place the head and eyes (after a few times of redirecting to not eat them), and then I added the ears, nose, and feet. You can cut the body out of paper and use cotton balls to make it fluffy, have your child draw the face, or cut out each piece themselves.
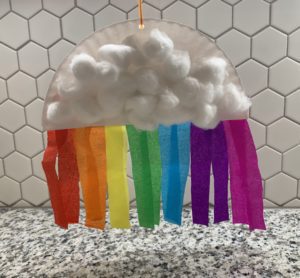
Rainbow:
Possible Supplies: paper plates, paper streamers or construction paper or tissue paper, scissors, glue, cotton balls, yarn
Directions/Options: I made two different options here (as we have not completed this project with our small group yet). The first is to cut the paper plate in half and glue cotton balls on top. Then, flipping over the plate, glue strips of paper streamers to the back. To turn into a hanging piece, hole punch the top and thread yarn through. The more advanced option included the same streamers and paper plate, but I cut them into smaller pieces and glued them in the ROYGBIV pattern onto the plate. I added a few cotton balls for clouds after it dried.

Our small group has been such a treat in our week, and one of my favorite parts is seeing how different everyone’s projects turn out! There truly is no right or wrong way to make these!


